


Home » Archives for tháng 8 2017
Sử dụng tùy chọn group để ẩn và hiển thị các cột excell
16:43:00 |
1. Chọn bảng của bạn.
2. Nhấn Shift + Alt + mũi tên phải.
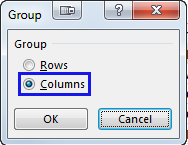
3. Bạn sẽ thấy hộp thoại Group xuất hiện. Chọn Columns và nhấp OK để xác nhận.
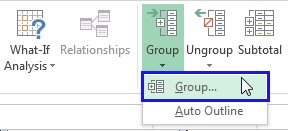
Chú ý: Bạn cũng có thể mở hộp thoại trên bằng cách chọn Data -> Group -> Group
Chú ý: Bạn có thể chọn vùng dữ liệu và nhấn Shift + Alt + mũi tên trái để bỏ nhóm.
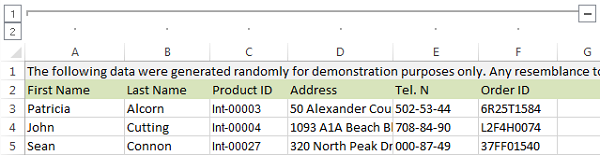
Thao tác này sẽ thêm các ký hiệu Outline đặc biệt vào bảng của bạn.
4. Bây giờ hãy chọn các cột bạn muốn ẩn từng cái một và nhấn Shift + Alt + mũi tên phải cho từng cột.
Chú ý: Không thể chọn cột không liền kề
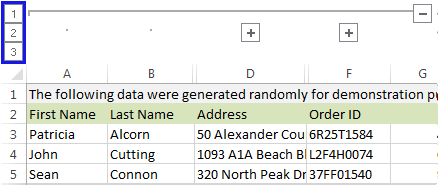
Ngay khi bạn nhấn phím tắt, bạn sẽ thấy biểu tượng “-“ được thêm vào phía trên các cột đã chọn.
5. Nhấp vào biểu tượng “-“ sẽ ẩn cột và biểu tượng sẽ thay đổi sang “+” cho phép bạn bỏ ẩn dữ liệu.
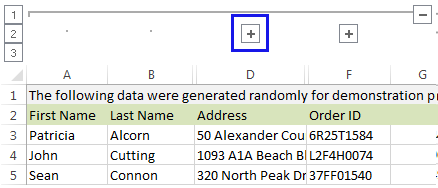
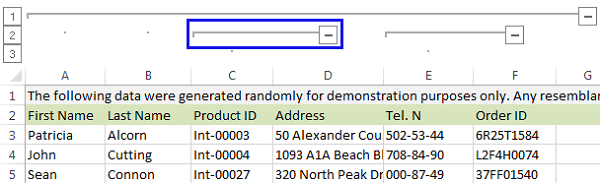
6. Bạn cũng có thể sử dụng các con số nhỏ ở góc trên cùng bên trái. Chúng cho phép bạn ẩn và bỏ ẩn tất cả các nhóm cùng cấp ngay lập tức. Ví dụ: trong bảng trong hình, nhấp vào 1 sẽ ẩn toàn bộ bảng và nhấp vào 2 sẽ ẩn cột C và E. Điều này đặc biệt hữu ích nếu bạn cần tạo phân cấp của nhóm.
Excel to CI - Can't find Project or Library
13:30:00 |
Excel to CI libraries by default it refer to 'PS_HOME/Excel' directory
This error will due to the, this folder is not reachable for the excel.
If any excel to CI template will give below error. Follow the below steps to solve.
1.
This error will due to the, this folder is not reachable for the excel.
If any excel to CI template will give below error. Follow the below steps to solve.
1.

2. Click Ok & go to the Excel press < Alt + F11 > key. It will open Visual Basic Editor.

3. Follow the Screenshot

4. Check the missing library in below screenshot

5. This RelLangMcro.xla will be located in
Copy this file & paste into your current excel to CI folder.
for eg: the Excel to Ci tmeplate present c:\test. place the missing file in C:\test.
:-)
Basic Steps to Create an Application Engine in PeopleSoft
13:18:00 |
In reviewing my statistics, I found that one common search was “basics steps to create an appengine in PeopleSoft”. I hope the person(s) found what they were looking for on my blog. Nonetheless, that gave me the idea to write a simple overview on creating a new Application Engine program.
- Creating a new Application Engine definition
- Setting program properties
- Understanding program flow
- Inserting new sections, steps, and actions
- Loops/logic
- State records
- Adding programs to projects
- Where to go from here
Creating a new Application Engine Definition
Application Engine programs are definitions that are created and edited within Application Designer. So, open Application Designer and log in. Next, either use the File > New menu, press Ctrl + N, or click on the “New” icon on the toolbar.
File > New / Ctrl + N:

New icon on the toolbar:

After you do that, you should get a New dialog. There is where you tell Application Designer what type of new object you want to create. From here, you will want to choose the “App Engine Program” object type.

This should give you a new Application Engine program window:

You probably want to save your program as you go. You can use File > Save or Ctrl + S or the Save icon on the toolbar. The first save will prompt you for a name for your new program:

Settings Program Properties
The first thing you need to do is set your properties. If nothing else, you need to check the “Disable Restart” button. So, click on the properties button on the toolbar.

On the first tab of the properties, you should enter a general description of your program. In the comments area, you want to describe in more detail what your program does. You should also enter the date, author, and description of changes to the program throughout it’s lifetime.

Read on for more information about State Records later, but the State Records tab is where you connect the state record with your program.

This is the most important property to set. On the fourth tab, make sure to check the disable restart option. In my opinion, this should be default. I don’t have room to go into all of the reasons, but let’s just say that in order to make a program restartable, you need to make several design decisions first. If you want your program restartable, get it running first, check that your design is restartable, and then, come back here and uncheck the disable restart option.

Understanding Program Flow
The first that you need to understand is what the parts mean and how it runs each piece. So, here are the parts:
- Program: a complete application (or a library of functions)
- Section: like a function in a regular language
- Step: a single task; like a line of code in a regular language
- Action: a single action; like a clause in a regular language

The most important thing to understand is that the program starts at the first step in the “MAIN” section. It runs to the last step of the MAIN section in sequence. At the last step, the program is done. The other sections do not run unless they are explicitly called with a “Call Section” action.

Don’t let the names of the steps confuse you. The name can be anything. The step sequence number (circled below) is what controls the order of the steps. If you’re not careful, the step names can confuse you. In the following example, step02 runs first before step01.

Also, you can’t control the order of the actions. You should have only one action per step unless you are doing looping. If you do insert two actions into the same step, you can hit the refresh button on the toolbar and it will rearrange the actions in the order in which they will execute.

Inserting New Sections, Steps, and Actions
These three buttons on the toolbar insert new sections, steps, and actions (respectively). You can also use the insert menu.

The part of the program you have selected is significant when inserting a new part. When inserting a section, you used to have to select the previous section. Also, the order of the sections does not matter, so once you hit the Refresh button it will alphabetize them by their name. (Remember sections run in the order they are called from MAIN.)
To insert a step, select the step before, and it will insert the new step after what you have selected. The program will never change the order of the steps. If you want to reorder them, you have to cut and paste them in the new location.
To insert an action, select the action or step before, and it will insert the new action afterward. Again, remember that you can’t control the order of the actions. After you insert the action, you will need to change the type in the drop down:

For most of the actions, you will want to double click on the grey area of the action and open the PeopleCode or SQL editor. This is what defines exactly what the action does.
Loops/Logic
Complex logic is best done inside of PeopleCode steps. Note that you can have an App Engine program with a single PeopleCode step/action. The PeopleCode can do all of the work for you.
That being said, you can do some logic flow with looping and such in the App Engine itself. This is accomplished with the following action types:
- Do Select: like a for loop, loops through a set of rows
- Do While: like a while loop
- Do When: like an if statement
- Call Section: branches to another section
First, let’s talk about Do Select. It is compared to a “for” loop in other programming languages. Really, it is looping through a result set of rows returned by a select statement. So, you’ll define a SQL statement for the Do Select action. The program will execute the statement and execute the following actions in the step for each row returned.

Keep in mind that you can only have one of each action type with each step. If you need to execute two SQL statements for each row, you will have to create a new section with those SQL actions and use a Call Section with your Do Select.
Next, the Do While loop will go until no rows are returned. It is similar to the Do Select except that it executes the SQL statement every iteration. The actions following it are executed when the SQL statement returns 1 or more rows. Also, note that the actions are executed once for each time the select statement is run no matter how many rows are returned.

Now, the Do When action is like an If statement. Basically, if the select statement returns a row, that’s true. If no rows result, it’s false. So, if the Do When select statement returns a row or more, it executes the action. If no rows are returned, it moves on to the next Step without running any more actions in the current step.

Finally, the Call Section action is simple: it just runs all the steps in the selected section and comes back to the next step.

State Records
Now, you have the program flow mastered, but you need to know how to pass information between the steps. The State Record is your tool. If you are familiar with COBOL, the state record is like the working storage area on a COBOL program. Or, you could say that the state record is the variables for the App Engine program.
So, to create a state record, you just need to create a new record with a name that ends with “AET”. You can create a new record the same way as you created the App Engine definition.

In your new record, you need to add at least three fields: PROCESS_INSTANCE, RUN_CNTRL_ID, and OPRID. You can use the Insert > Fields menu to add fields. The PROCESS_INSTANCE should be a key.

Next, on the record type tab, you should either select Derived/Work or you should select SQL Table. If you choose SQL Table, you will need to go through the Build process when you create and each time you change the record. If you use Derived/Work, you may loose the information in the state record when the program commits (which is no problem if the only commit you have is at the end).

Now, when you save it, make sure that you add the “AET” to the end of the name. You will not be able to select it on the State Record screen unless it is named appropriately.

Once you have the state record saved, you need to connect it to the App Engine program. To do so, open the App Engine properties and go to the State Record tab. Enter the name of the state record in the search box, click the “Get List” button, select the record in the “Record List”, and finally click the “Add” button.

Finally, we can use our state record in our program. With SQL statements, we can use two different meta-sql commands:
- %Select: loads a value selected from the database into the state record
- %Bind: places a value from the state record into a SQL statement

For example, the %Select in this statement will read the EMPLID returned by the select statement and place it in the state record. Because this is a Do Select, it will fetch each row and run the rest of the actions in the step for each row. When the action runs the first time, the EMPLID field in the state record will have the EMPLID from the first row as the actions run. The state record will have the EMPLID from row 2 as the actions run the second time, and so on.

This next example uses %Bind to pull the value from the state record and insert it into a staging table.

Also, in PeopleCode steps, you can refer to the state record with the Record.Field syntax. If you are familiar with PeopleCode on a page, you understand the buffer. The buffer for a PeopleCode program in App Engine is your state record, and you access them as if they were in the buffer.
Running/Testing
The easiest, quickest way to test your new program is to run it from Application Designer. When you have the main App Engine window active, you can click the Run button. You can also use the Edit > Run Program… menu.

This opens the Run Dialog window. You want to make sure that you select Output Log to File. If you don’t, the window will close and you won’t be able to see any of the output. I also uncheck the Run Minimized option so that I can see the window open and close more easily. Pay attention to the Log File Name because the first thing you want to do when it is done is view the output.

You will eventually want to set most programs up to run online from a Run Control. Creating a run control is outside of the scope of this post, but here are some thoughts that might help you toward that direction:
- You will need to create a page with the process scheduler sub page on it and a component containing the page.
- You will need to create a Process definition where the Process Type is application engine and the name is the same name as your program.
- You will need to enter the new component name on the Process Definition and select a Process Group that you have access to.
- When your program starts, PeopleTools will automatically populate the Process Instance, Operator ID, and Run Control ID fields for you.
- One of the first steps in your program will be to select the parameters from your run control page into your state record. You will use the Run Control ID and Operator ID that is pre-populated to get the correct values.
Adding Programs to Projects
As you create your program, you should be adding it to a project. This ensures that once you have it working, you can easily migrate it to your test environment and eventually to production. The catch is that the program has different parts that must be inserted individually. The program as a whole must be in the project. Each section must go into the project, as well as each individual SQL or PeopleCode program.

You run into problems when you miss a part. App Designer cannot migrate a child definition if the parent definition does not exist in the target. For example, you can’t migrate any sections if the parent App Engine program does not exist in your target environment. You can’t migrate a Do Select SQL statement if the section with the parent step/action does not exist in the target.
As you go, I recommend using the F7 key to insert everything your create or change as you do it. This ensures you don’t forget anything. When you create a new section, you can right click on the section and insert it into the project:

Assuming you want all of the program and its parts in your project, you can use the insert related definitions option. Remember, you only want to do this when you created the program by yourself. If you only modified some of the parts, you only want the parts in your project that you actually changed. To, use the option, press Ctrl + F7 or use the Insert > Definitions Into Project. Before you insert the program into the project, highlight all of the Related Definitions.

Basic Navigations (Application Designer) Steps for creating Field,Record,Page,Component and Menu in PeopleSoft
13:15:00 |
-->Open the Application Designer.
-->Click on File->New
-->In the New Definition Pop Up Window Select Field and double click on it.
-->Select the Field Type as Character.
-->Select the appropriate Field Length (Ex:-20)
-->In the Label ID give the appropriate name (Ex:-AST_HARSHA_EMP_ID)
-->In the Long Name give the appropriate name (Ex:-Employee Name)
-->In the Short Name give the appropriate name (Ex:-EName)
-->Save the Project with appropriate name (Ex:-AST_HARSHA_EMP_ID)
-->Click on Insert-->Click on Current Definition in to project or Hit F7.
-->REPEAT THE SAME ABOVE PROCESS FOR EMPLOYEE NAME.
Creating a Record: (TBL)
-->Click on File-->New
-->In the New Definition Pop Up Window Select Record and double click on it.
-->Drag and drop the Emp_Id and Emp_Name from the Fields.
-->Double click on the Record's and the Record Field Properties Pop Up Window Opens.
-->In Record Field Properties Pop Up Window Select the Key Checkbox and click on OK.(This is Option which is used to establish the relation)
-->Click on Record Type and select Sql Table radio button.
-->Save as AST_HARSHA_TBL
-->Click on Ok
-->Click on Insert->Click on Current Definition in to project or Hit F7.
-->From the Records select AST_HARSHA_TBL right click and click on Build-->In Build Options select the checkbox's Create Tables in Build Options and Execute SQL now in Build Execute Options
-->Click on Build.
-->After the process getting completed close the Build Progress window
-->Open SQL server
-->Execute the SQL statement by selecting the appropriate database (Ex:-HCMTRA90)
-->select * from PS_AST_HARSHA_TBL (Hit on F5).
Creating a Page: (PNL)
-->Click on File-->New
-->In the New Definition Pop Up Window Select Page and double click on it.
-->Resize the Page by Right click->Page Properties-->Use-->Select the required page size and click on Ok.
-->Drag and Drop the Records
-->Align the page
-->save the page as AST_HARSHA-PNL
-->Click on F7
Inserting the Scrolling : ( Which allows inserting Multiple Values at run time)
-->Click on Insert
-->Click On Scroll Area
-->Double click on the scrolled area.
-->Click on Label
-->Uncheck the Display footer check box.
-->Click on the Properties of Display Title.
-->In the Text enter the Name to be displayed.
-->Click on Ok.
Components:
-->Click on File-->New
-->In the New Definition Pop Up Window Select Component and double click on it.
-->Drag and drop the Page Component.
-->Re Name the Item Label (Ex:-Harsha Employee Id)
-->Save it as AST_HARSHA_CMP
-->Then in the Component Properties in the Search Record Field select the file (Ex:-AST_HARSHA_TBL)
-->Click on Ok.
-->Save it as AST_HARSHA_CMP
-->Hit on F7.
-->Select the component file(Ex:-AST_STUDENT_TBL).
-->Right Click and click on Build-->Click on Yes
-->Select the checkbox create tables in Build Options.
-->Select the Radio Button Execute SQL now in Buid Execute Options
-->Click On settings
--> Click On Logging tab
-->Select/enable the Log Settings check Box
-->Click on Ok.
-->Click on Scripts Tab
-->Select the Radio Button Output to single file and in script file names give the path to store the scripts as separate files
-->Click On ok
-->Click On Build.
Creating Menu:
-->Click on File-->New
-->In the New Definition Pop Up Window Select Menu and double click on it.
-->Select Standard from the New Menu and click on Ok.
-->Double click on the Dotted area.
-->In the Bar Item Properties pop Up window Name it as AST_HARSHA_PROCESS
-->Name the label as Harsha.
-->From the component darg and drop the AST_HARSHA_CMP (GBL) in the process sub menu
-->save it as AST_HARSHA_MENU
-->Hit F7
-->Click on File-->Click on save project-->HARSHA_EMP
-->Select the process sub Menu-->Right Click-->Click on register Menu Item
-->Click on next
-->Select Folder Name as AST_HARSHA.
-->OBJECT OWNER ID: HHR (Human Resource)
-->Select the check box Always use default node.
-->Click on Next
-->Click on Select and In Select Permission List -->In Name field give as HCCPFGALLP
-->Click on Next
-->Select the Permission List Check Box
-->Click on Finish.
Những Bài Xẩm Hay Nhất Của Nghệ Nhân - NSƯT Hà Thị Cầu
13:09:00 |
Mẫu Bài đăng Video

Lời bài thập ân.
Nghĩa mẹ sinh thành, chớ có quên công cha ngãi mẹ sinh thành
Lời bài thập ân.
Nghĩa mẹ sinh thành, chớ có quên công cha ngãi mẹ sinh thành
Mẹ mang con chín tháng, thai sinh một giờ
trong lòng mẹ chả ngại tanh dơ
Nuôi con từ thở trứng nước, ngây thơ như là
Chớ có quên công cha ngãi mẹ sinh con ra
Công mẹ cũng lắm, công cha thời nhiều,
nào là khi bồng bế cơm sữa nâng niu
Sinh con trai, con gái Công lao cha mẹ thì nhọc nhằn,
cho đêm ngày con bú con ăn
Đêm nằm quần áo, chiếu chăn nó ướt đầm đầm
chỗ ướt thời mẹ chịu đành tâm, ráo xê con lại con nằm cho nó êm
Đốt ngọn đèn con ơi suốt cả thâu đêm, chờ cho con đi ngủ ấm êm
Mẹ nằm mong ngày, con ơi thì mong tháng mong đủ cho đầy năm
Mong bao giờ được, lớn khôn bằng người
Trước là con thành kính con phải đạo trời
Kính thời đôi bên cha mẹ là người hiếu trung
Công thái sơn phụ mẫu ngàn trùng
Đói nghèo mẹ khuyên con cứ ở hiếu trung thảo hiền
Cha mẹ thì thời phòng khi chân yếu tay mềm
Đền cơm trả sữa kẻo phiền mẹ cha
Nuôi con mong con tươi tốt được bằng hoa.
Phòng khi mình già mà tuổi luống, cha già nhờ con
Bõ công con lội suối trèo non
Cha tu nhân, mẹ còn tích đức cho con sau này
Ở có tiên, con ơi thời hậu được vấy ai
(Cha giồng cây đức, mẹ ơn giầy đền ân
Trong phép làm người mẹ khuyên con giữ đạo lý hiếu thân
Cảm thương cha mẹ, ân cần ra con mặc lòng ai thời phải đạo làm con
Phải nhớ đến công cha mẹ lại càng nhớ thương
Đường thập ân nói đến cha mẹ con thương
Lặng mà nghe tôi kể đoạn trường khúc nhôi)
Kể từ một ân trong lòng mẹ mới có thai
Âm dương nhị khí, nào ai biết gì nơi trong lòng mẹ chịu sầu bi
Miệng thời cay đắng, dạ thời mẹ héo hon
Bữa cơm ăn mẹ ăn không, biết miếng ngon
Lòng mẹ đắng cay chua xót về con đêm ngày
Sang đến hai ân mà công cha ngãi mẹ biết bao tày
Mẹ mang con chín tháng, có thai nặng nề
Thương con mẹ đi sớm về trưa
Của ngon vật lạ mẹ chả hề ước ao
Mang mẹ cùng con thì khó nhọc đã ôm giao
Não nề mẹ chịu, quản bao công trình
Sang tới ba ân con ơi vừa tới tháng sinh
Khác nào ruột mẹ một mình ái ương
Kể từ, con ơi thập nguyệt thai dương
Thêm vào mẹ mang mẹ cùng con nhọc nhằn
Có mang con vật lạ mẹ không ăn
Đã được chín tháng mẹ trông mong cho nó đủ mười ngày
Mong tới tuần bông hoa nở liền tay
Bao giờ con đấy cha mẹ thì đứng đây với mừng
Quý con lạng vàng con ơi cân giá đã nào bằng
Lưng bằng thì bằng ngọc coi bằng bông hoa
Láng thấy tai nghe thời con khóc ở trong nhà
Tuy nó đau lòng mẹ, nhưng mà được làm con
Công sinh thành đạo đức bằng núi non
Vì con cha mẹ chịu chiếu giường tanh hôi
Đường cù lao vất vả con ơi, góc bể bên trời lai láng cồn toan
Sang đến bốn ân nuôi con tha thiết mẹ cơ hàn
Tanh dơ mà lai láng, chứa chan ướt đầm
Chỗ ướt thời mẹ chịu cho đành tâm
Ráo xê con lại con nằm cho nó êm
Đốt ngọn đèn con ơi suốt cả thâu đêm để chờ cho con đi ngủ ấm êm
Mẹ nằm mong mấy ngày con ơi mong tháng mong đủ đầy năm
Năm ân sài ghẻ con cam
Của ngon vật lạ, mẹ không ham không hề
Bao nhiêu của lạ vật gì
Miếng ngon miếng ngọt cha mẹ nhường thì để cho con
Miếng nào cay đắng không ngon
Chịu khó mẹ ăn vậy cho con nhưng là
Sang đến sáu ân nuôi con phải đứa hay khóc cha mẹ mà lo thay
Ru đêm mẹ quên ngủ, ru ngày mẹ quên ăn
Sang đến mùa đông trời làm cho giá rét căm căm
Chỗ ướt mẹ nằm, chỗ ráo mẹ để xê con
Thiếu gì của lạ miếng ngon, thiếu gì thịt cá, giò nem ngọt bùi
Bữa cơm mẹ ăn với muối, mẹ lại khen bùi
Cái bát nước nhân trần uống vào đắng ngắt chả biết màu gì ngon
Sang đến bảy ân mẹ giật mình về lúc con lên hoa
Biết bao cha mẹ khó nhọc xót xa đêm ngày
Tha hồ cha mẹ nặng nhọc, đắng cay
Tổn bao tiền của, thuốc ông thầy quản chi
Trông mong con từng cự từng kỳ
Cha mẹ lo cho chúng con từng tí, tí tị từng ti
Lo hoa con đau lòng cha mẹ chả an thân
Lòng cha mẹ nát, lo vì con
Thương thay lòng mẹ ngồi bế con
Nước mắt nó chảy ra cuồn cuộn
Như nguồn non xanh
Đói lo bấm gan mẹ nhịn cho đành
Cầu cho con khỏe mạnh lành là hơn
Sang đến tám ân kể bao siết nỗi nguồn cơn
Thời lòng cha mẹ, nhi quên bối sầu
Bể trời rộng cả cao sâu
Ai lấy câu mà nhắc, ai hầu được chưa
Cha mẹ lo cho chúng con ngày tháng đã thoi đưa
Để dương cao thì bay ráo
Bây giờ đã hay, nào là Quế, Nhung tiền nợ ông thầy
Lo cho con hết bao nhiêu của, đêm ngày vì con
Thương thay lòng mẹ vì con
Gia tài cơ nghiệp vì con nhưng là
Mừng có cầu cao bể rộng đã qua
Bây giờ cha mẹ mới đà an thân
Con lớn khôn đôi bên cha với mẹ đã mừng thầm
Đêm khuya hoàng cầm, dạy bảo mà nuôi
Trông thấy con ăn nói đã tươi cười
Bây giờ cha mẹ vấy nguôi trong lòng
Trông thấy con tươi tốt đẹp đẽ thì hình rong
Bây giờ cha mẹ bằng lòng dưỡng sinh
Sang đến chín ân, nuôi con nay đã trưởng thành
Gái trai định liệu học hành đèn sách thì văn chương
Trai với thời cho thi đỗ khoa trường
Khôi nguyên thì nhất cử bảng vàng đề danh
Cô con gái thời cha mẹ thì lại dạy hiển vinh
Dạng rỡ muôn đình, rể ngọ sang đông
Sang đến mười ân nuôi con đủ cả vợ chồng
Con con thì cháu cháu, chắt chắt thong rong được thọ trường
Cả gì hơn ông bà phụ mẫu đại đường
Tử tôn huynh thịnh văn chương đời đời
Chuyện thập ân từ đó mà thôi.